Developing an Obsidian Plugin
From challenges to solutions, here's my adventure of creating the Obsidian AI Summary Plugin to enhance note-taking with AI-powered summarization.
Embarking on the journey to develop the Obsidian AI Summary Plugin has been a thrilling adventure full of challenges and learning opportunities. In this post, I'll take you through my development process, the hurdles I faced, the solutions I discovered, and why you might find this plugin incredibly useful for your note-taking experience in Obsidian.
The Beginning: Identifying the Need
Obsidian is a powerful tool for managing notes and knowledge, but as my notes grew, I found it increasingly difficult to quickly digest lengthy content. It was then that I realized the need for an AI-powered summarization tool that could seamlessly integrate with Obsidian.
Overcoming Initial Challenges
The first challenge was to understand the capabilities of the OpenAI API and how to leverage it for text summarization. Integrating an external API into Obsidian, while maintaining the seamless user experience that Obsidian users are accustomed to, was no small feat.
- Obsidian Plugin Environment: Obsidian's plugin environment was another area that required deep diving. Understanding how plugins are structured, how they interact with Obsidian's core, and the best practices for plugin development took time and experimentation.
- API Integration: Learning the intricacies of the OpenAI API was the first hurdle. It involved comprehending API calls, managing tokens, and ensuring the requests were optimized for performance.
Anatomy of a Plugin
A lifecycle of a plugin in Obsidian, focusing on the onload and onunload methods. The onload method is invoked when the plugin is activated, where resources and functionalities are configured. Conversely, the onunload method is called when the plugin is disabled, ensuring resources are released to maintain performance.
import { Plugin } from "obsidian";

export default class ExamplePlugin extends Plugin {
  async onload() {
    console.log('loading plugin')
  }
  async onunload() {
    console.log('unloading plugin')
  }
}
Also I would like to make a shoutout to PJ Eby he was kind enough to provide a Hot Reload plugin that allows you to reload your plugin without restarting Obsidian. This is a huge time saver during development.
Steps of implementation
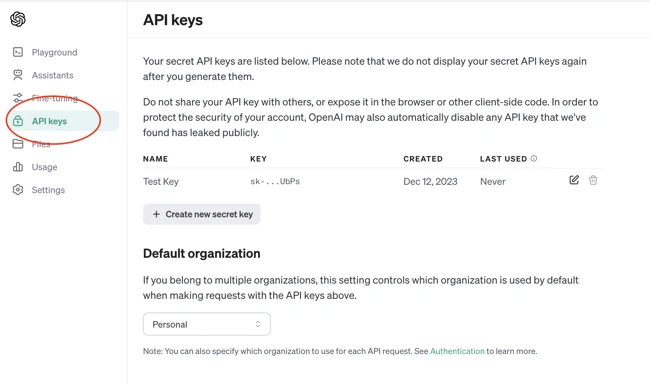
- Obtaining API keys from OpenAI is the first step towards installing ChatGPT on your plugin. These keys are used to connect your server to the ChatGPT service and allow communication and exchange of data, which is why you need them.
- The next step would be decide on the type of summarization you want to implement. Obviously, you would want to give some options to the user like what model to use or setting a max token size. For more convinience, Setting
stream: truein a request makes the model start returning tokens as soon as they are available, instead of waiting for the full sequence of tokens to be generated. Also to manage costs and performance, you can set a max token size to limit the length of the summary.
Developing the Solution
Armed with knowledge, I started developing the plugin. Here are some key features and how they were implemented:
AI Summarization Plugin Core
This was the core feature. Using the OpenAI API, the plugin sends the selected text to the AI, which then returns a concise summary. The challenge was to make this interaction swift and user-friendly.
Here is the code snippet for the onload method where the plugin is loaded and the settings are configured. Notice lines between 9-17 where the command is added to the context menu. It also checks if the selected text is long enough to be summarized.
	async onload() {
		await this.loadSettings();
		console.log(`AI Summarize v${this.manifest.version} loaded!`);

		this.addCommand({
			id: 'summarize-selection',
			name: 'Summarize selection',
			icon: 'lucide-bot',
			editorCallback: (editor, ctx) => {
				const selected = editor.getSelection();
				const wordCount = selected.split(' ').length;

				if (selected) {
					if (wordCount > 10) {
						this.generateSummary(selected, editor);
						return true;
					}

					Notify('Selected text is too short!');
					return false;
				}
			},
		});

        // This adds a settings tab so the user can configure various aspects of the plugin
		this.addSettingTab(new AiSummarizeSettingTab(this.app, this));
	}
Before diving into the generateSummary method, let's take a look at the settings that are loaded in the onload method.
  		// This adds a settings tab so the user can configure various aspects of the plugin
		this.addSettingTab(new AiSummarizeSettingTab(this.app, this));
The settings include the API key, default prompt, maximum tokens, and model to use for summarization. For each setting Obsidian provides a method for input type and a way to save the settings and update the plugin accordingly.
export default class AiSummarizeSettingTab extends PluginSettingTab {
	plugin: AISummarizePlugin;

	constructor(app: App, plugin: AISummarizePlugin) {
		super(app, plugin);
		this.plugin = plugin;
	}

	display(): void {
		const { containerEl } = this;

		containerEl.empty();
		new Setting(containerEl).setName('General Settings').setHeading();

		new Setting(containerEl)
			.setName('API key')
			.setTooltip('Get your OpenAI API key from https://platform.openai.com/account/api-keys')
			.setDesc('OpenAI API key is required to use the AI Summarize plugin.')
			.addText((text) =>
				text
					.setPlaceholder('Your API Key')
					.setValue(this.plugin.settings.apiKey)
					.onChange(async (value) => {
						this.plugin.settings.apiKey = value;
						await this.plugin.saveSettings();
					}),
			);

		new Setting(containerEl)
			.setName('Max tokens')
			.setDesc('Max tokens to generate the summary. Default is 1000.')
			.addText((text) =>
				text
					.setPlaceholder(defaultMaxTokens.toString())
					.setValue(this.plugin.settings.maxTokens?.toString() || defaultMaxTokens.toString())
					.onChange(async (value) => {
						this.plugin.settings.maxTokens = Number.parseInt(value);
						await this.plugin.saveSettings();
					}),
			);

		new Setting(containerEl)
			.setName('AI Model')
			.setDesc('The AI model to use for generating the summary. Default is gpt-3.5-turbo.')
			.addDropdown((dropdown) =>
				dropdown
					.addOptions({ 'gpt-3.5-turbo': 'gpt-3.5-turbo', 'gpt-4': 'gpt-4', 'gpt-4-turbo': 'gpt-4-turbo', 'gpt-4o': 'gpt-4o' })
					.setValue(this.plugin.settings.model)
					.onChange(async (value) => {
						this.plugin.settings.model = value;
						await this.plugin.saveSettings();
					}),
			);

		new Setting(containerEl)
			.setName('Default prompt')
			.setDesc('Default prompt for the AI to generate a summary.')
			.addTextArea((text) =>
				text
					.setPlaceholder('Your custom prompt')
					.setValue(this.plugin.settings.defaultPrompt)
					.onChange(async (value) => {
						this.plugin.settings.defaultPrompt = value;
						await this.plugin.saveSettings();
					}),
			);

		new Setting(containerEl)
			.setName('Summary in the frontmatter')
			.setDesc('This will put the generated summary in the frontmatter of the note otherwise the selected text will be replaced by the summary.')
			.addToggle((toggle) =>
				toggle.setValue(this.plugin.settings.putSummaryInFrontmatter).onChange(async (value) => {
					this.plugin.settings.putSummaryInFrontmatter = value;
					await this.plugin.saveSettings();
				}),
			);

		new Setting(containerEl).setName('KNOW HOW').setHeading();
		containerEl.createEl('p', {
			text: 'To generate a summary, select at least 10 words within a note. You can use the context menu by right-clicking on a selection and choosing "AI Summarize", or you can use the command palette and search for "AI Summarize".',
		});
	}
}
Replace Selection and Custom Prompt
Users can opt to replace the selected text with the summary or customize
Now let's take a look at the generateSummary method. This method is called when the user selects a text and wants to summarize it. The method takes the selected text and the editor as arguments. It then generates a prompt using the selected text and the default prompt set in the settings. The prompt is then sent to the OpenAI API to generate a summary. The summary is then either replaced with the selected text or added to the frontmatter of the note based on the user settings.
	async generateSummary(selectedText: string, editor: EnhancedEditor): Promise<string> {
		try {
			const activeFile = this.app.workspace.getActiveFile();

			if (!activeFile) {
				throw new Error('No active file found.');
			}

			const title = activeFile.basename;
			const promptText = `${this.settings.defaultPrompt} ${title ? 'title of the note is: ' + title + '\n' : ''} \n\n${selectedText}`;

			if (!!this.settings.apiKey) {
				Notify(`Generating summary...`);
				let message = 'Summary updated successfully.';
				(async () => {
					let summary = '';
					for await (const summaryChunk of prompt(promptText, this.settings.apiKey, this.settings.maxTokens, this.settings.model)) {
						if (!this.settings.putSummaryInFrontmatter) editor.replaceSelection(summaryChunk);
						summary += summaryChunk;
					}
					if (this.settings.putSummaryInFrontmatter) {
						this.app.fileManager.processFrontMatter(activeFile, (fm) => {
							fm['summary'] = summary;
						});
					} else {
						message = 'Selection summarized successfully.';
					}
					Notify(message);
				})();
			} else {
				throw new Error('Please enter your OpenAI API Key in the settings.');
			}
		} catch (error) {
			Notify(error);
			return;
		}
	}
Notice lines between 17-20 where the summary is generated and replaced in the editor as chunks of tokens are generated realtime.
Also at line 22, processFrontMatter() API provided by Obsidian is used to add the summary to the frontmatter of the note which makes it much more easier than modifying the YAML file manually.
Chat GPT Prompt Handler
The prompt method is responsible for sending the prompt to the OpenAI API and handling the response. The method sends the prompt to the API and receives the summary in chunks. The chunks are then processed and displayed in the obsidian. The method also handles the case where the API sends a [DONE] message to indicate that the summary is complete.
const url = 'https://api.openai.com/v1/chat/completions';

export async function* prompt(prompt: string, apiKey: string, maxTokens: number, model: string = 'gpt-3.5-turbo') {
	const requestOptions = {
		method: 'POST',
		headers: {
			'Content-Type': 'application/json',
			Authorization: `Bearer ${apiKey}`,
		},
		body: JSON.stringify({
			messages: [{ role: 'system', content: prompt }],
			temperature: 0.7,
			top_p: 1,
			frequency_penalty: 0,
			presence_penalty: 0,
			model: model,
			max_tokens: maxTokens,
			stream: true,
		}),
	};

	const response = await fetch(url, requestOptions);
	const reader = response.body?.pipeThrough(new TextDecoderStream()).getReader();
	let content = '';
	let gotDoneMessage = false;
	while (!gotDoneMessage) {
		const res = await reader?.read();
		if (res?.done) break;
		if (!res?.value) continue;
		const text = res?.value;
		const lines = text.split('\n').filter((line) => line.trim() !== '');
		for (const line of lines) {
			const lineMessage = line.replace(/^data: /, '');
			if (lineMessage === '[DONE]') {
				gotDoneMessage = true;
				break;
			}
			try {
				const parsed = JSON.parse(lineMessage);
				const token = parsed.choices[0].delta.content;
				if (token) {
					content += token;
					yield token;
				}
			} catch (error) {
				console.error(`Could not JSON parse stream message`, {
					text,
					lines,
					line,
					lineMessage,
					error,
				});
			}
		}
	}
	return content;
}
Notice lines between 16-18 where the API is called and the response is processed in chunks by using stream :true that I've mentioned earlier. The chunks are then yielded to the caller(main.ts) to be displayed in the editor. Also notice lines between 39-44 where the response is processed and the summary is yielded to the caller.
Adding the command to the context menu
This function also called inside main onload() method to add the same command to the context menu.
	handleHighlighterInContextMenu = (menu: Menu, editor: EnhancedEditor): void => {
		const selection = editor.getSelection();
		if (selection) {
			menu.addSeparator();
			menu.addItem((item) => {
				item
					.setTitle('AI summarize')
					.setIcon('lucide-bot')
					.onClick((e) => {
						if (editor.getSelection()) {
							const selected = editor.getSelection();
							const wordCount = selected.split(' ').length;

							if (wordCount > 10) {
								this.generateSummary(selection, editor);
							} else Notify('Selected text is too short!');
						}
					});
			});
		}
	};
Toggle Option: Frontmatter or Inline
Giving users the choice to either have the summary replace the selected text or add it to the frontmatter of the note ensured the plugin could adapt to various workflows.
Customizable Max Tokens
To cater to different summarization needs, I included an option to customize the maximum tokens used for summarization. This allowed users to control the length and detail of their summaries****.****
Keyboard Shortcuts and Command Palette
Inline Summerization from menu:
Frontmatter Summerization from command palette:
Advertising the Plugin
This plugin can be a game-changer for anyone who needs to quickly grasp the essence of lengthy notes. Whether you're a student, researcher, or professional, the Obsidian AI Summary Plugin can help you save time and enhance your productivity by providing a concise summary of your notes.
Who Should Use This Plugin?
- Students: Summarize lecture notes quickly.
- Researchers: Get the gist of journal articles without wading through pages of text.
- Professionals: Quickly reference meeting notes and project plans.
- Writers: Summarize research materials and drafts.
Installation
- Open Obsidian and navigate to Settings > Community Plugins.
- Search for "AI Summary" in the plugin list.
- Click "Install" to install the plugin.
- Once installed, enable the plugin by toggling the switch.
Usage
- Add your OpenAI API key to the plugin settings. You can obtain an API key by signing up for an account at
OpenAI. - Customize the prompt and maximum tokens if desired from plugin settings.
- Select the text within a note that you want to summarize. The selection must be at least 10 characters long.
- Use the designated shortcut in the context menu or command (AI Summarize: Summarize) to activate the AI summary tool.
- Choose whether to replace the selection with the summary or paste it under the "summary" property of the note's frontmatter.
- Enjoy the summarized content in your notes!
Configuration
- Customize the prompt and maximum tokens in the plugin settings, located in the Obsidian settings menu under "AI Summary Plugin."
Feedback and Support
If you encounter any issues, have suggestions for improvements, or need assistance, please feel free to submit an issue on GitHub.
Contributing
Contributions are welcome! If you'd like to contribute to the development of this plugin, please fork the repository, make your changes, and submit a pull request.
Thank you for joining me on this journey. I hope you find the Obsidian AI Summary Plugin as helpful and exciting to use as it was to develop.
Feel free to try out the plugin and let me know your thoughts. Happy summarizing!